My final project using the SparkFun Redboard for my physical computing class. I call it the Gameduino Snake since it is basically a small little hand held device which allows the user to play a game of snake on an LED matrix.
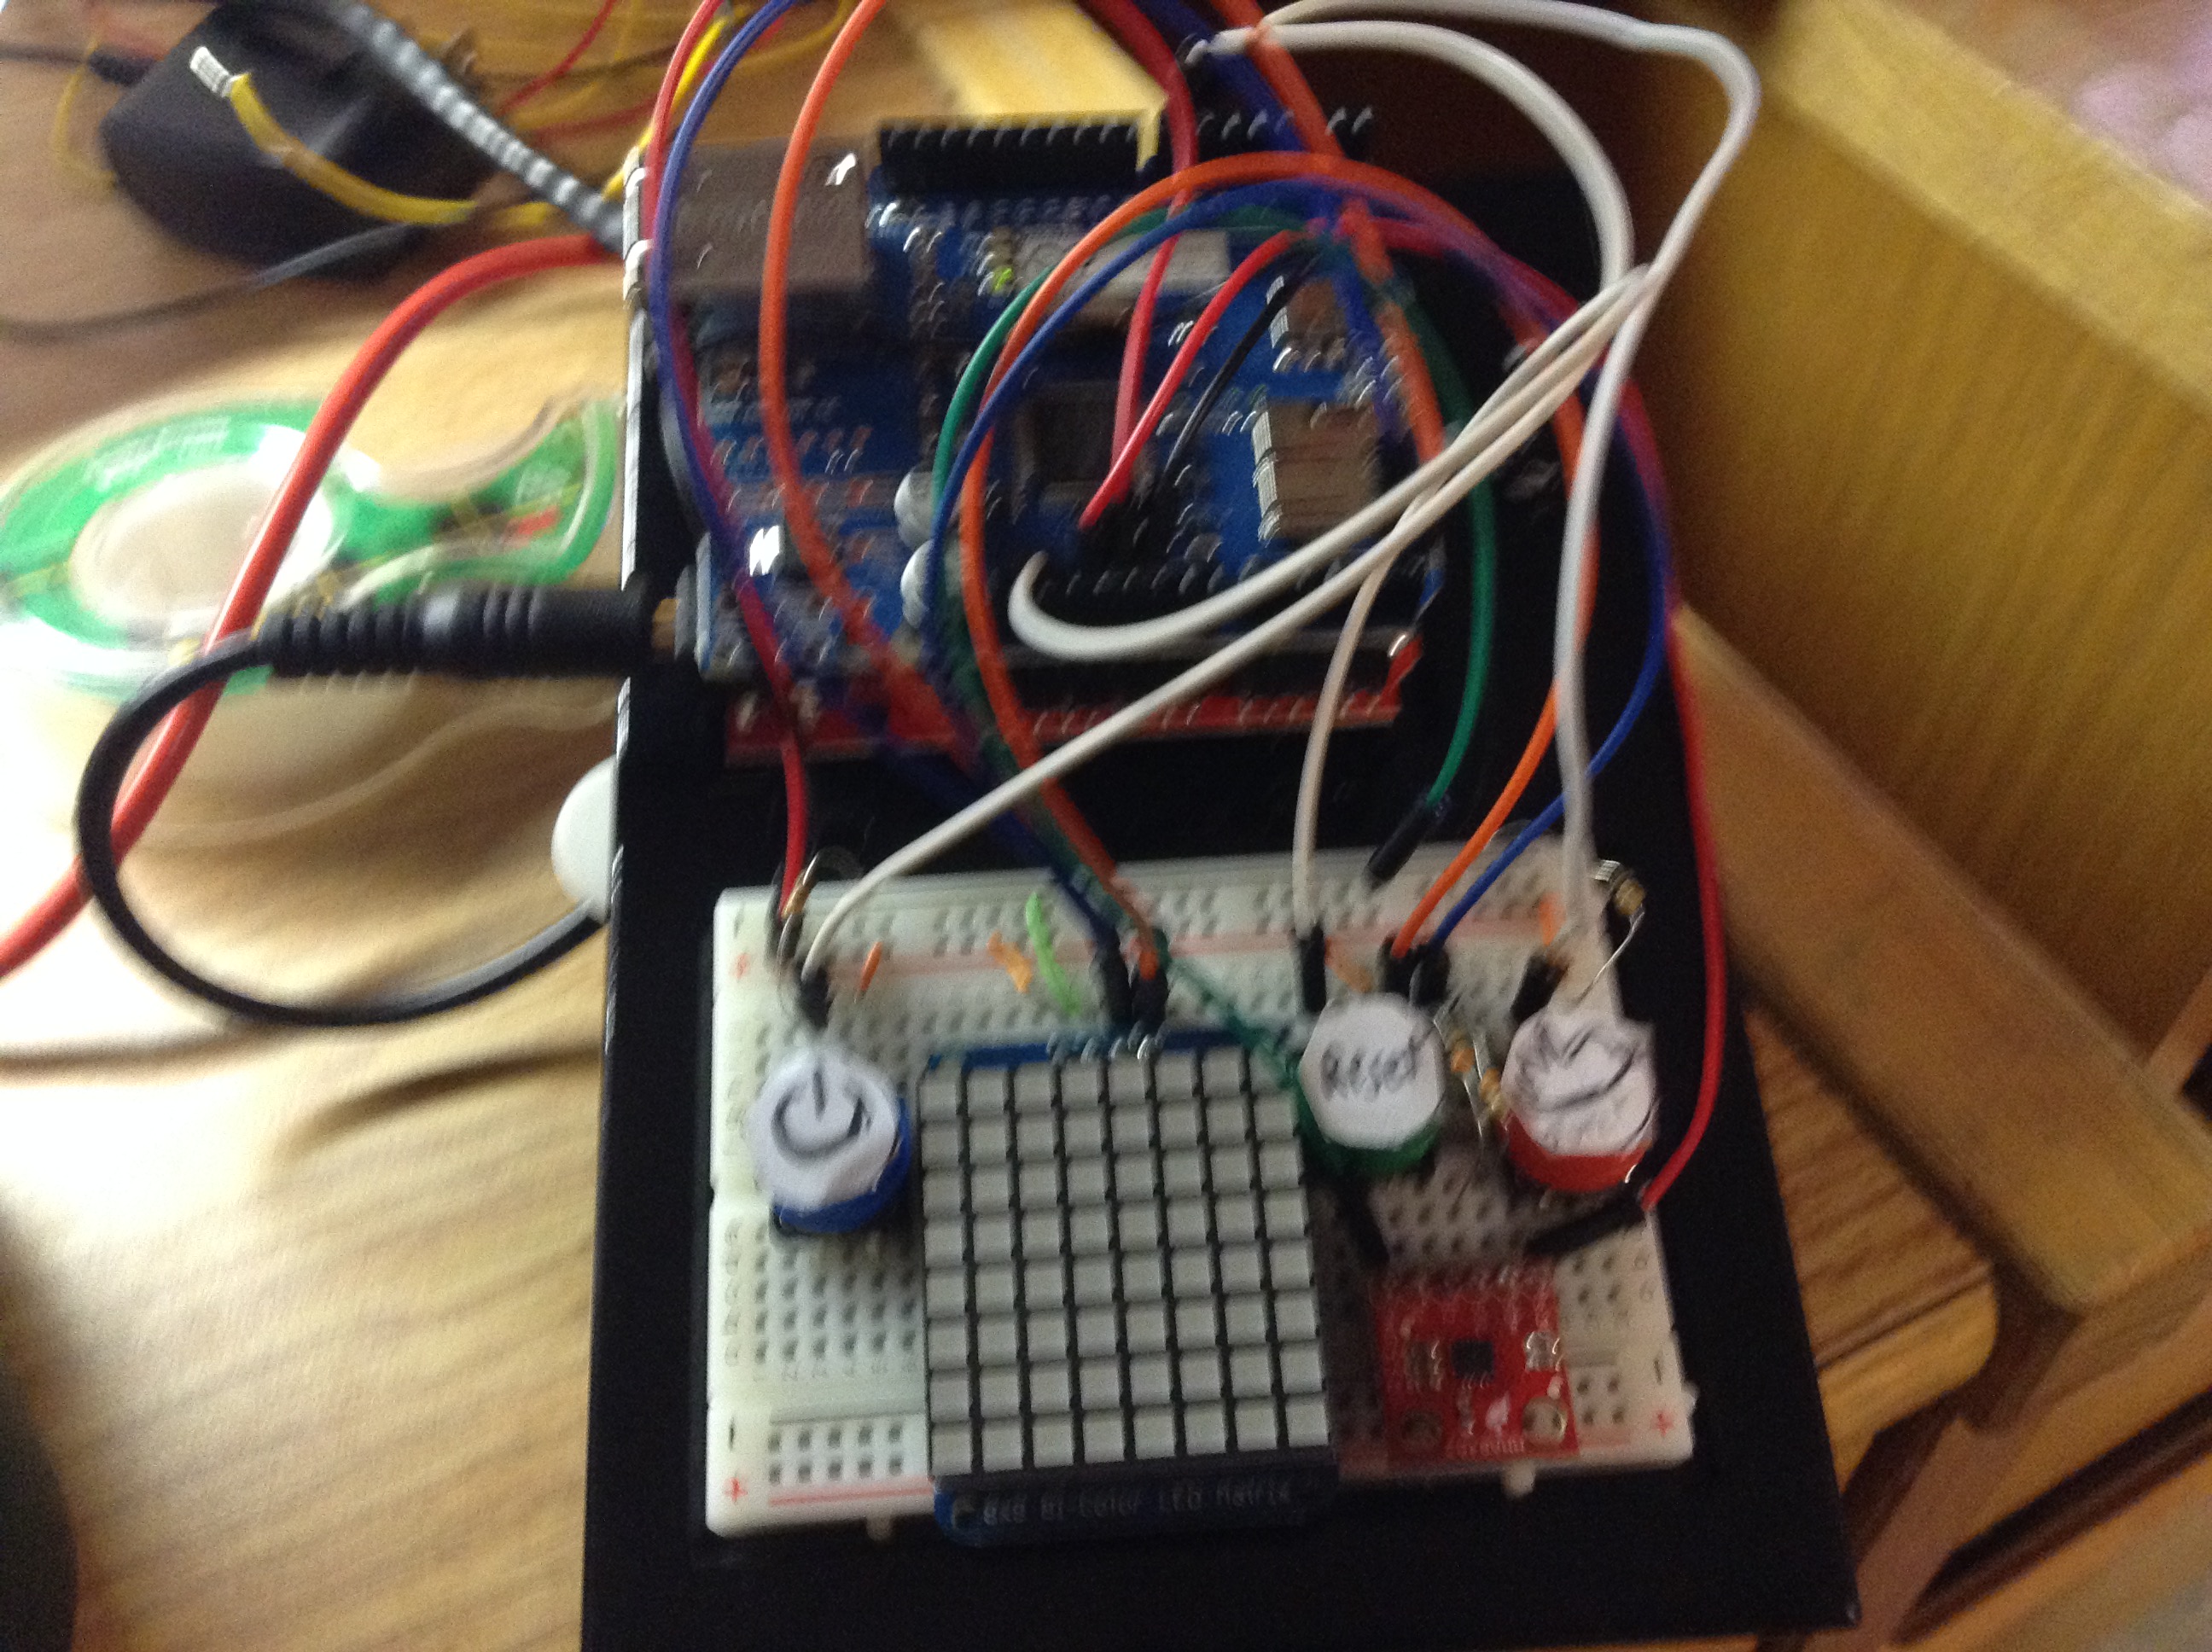
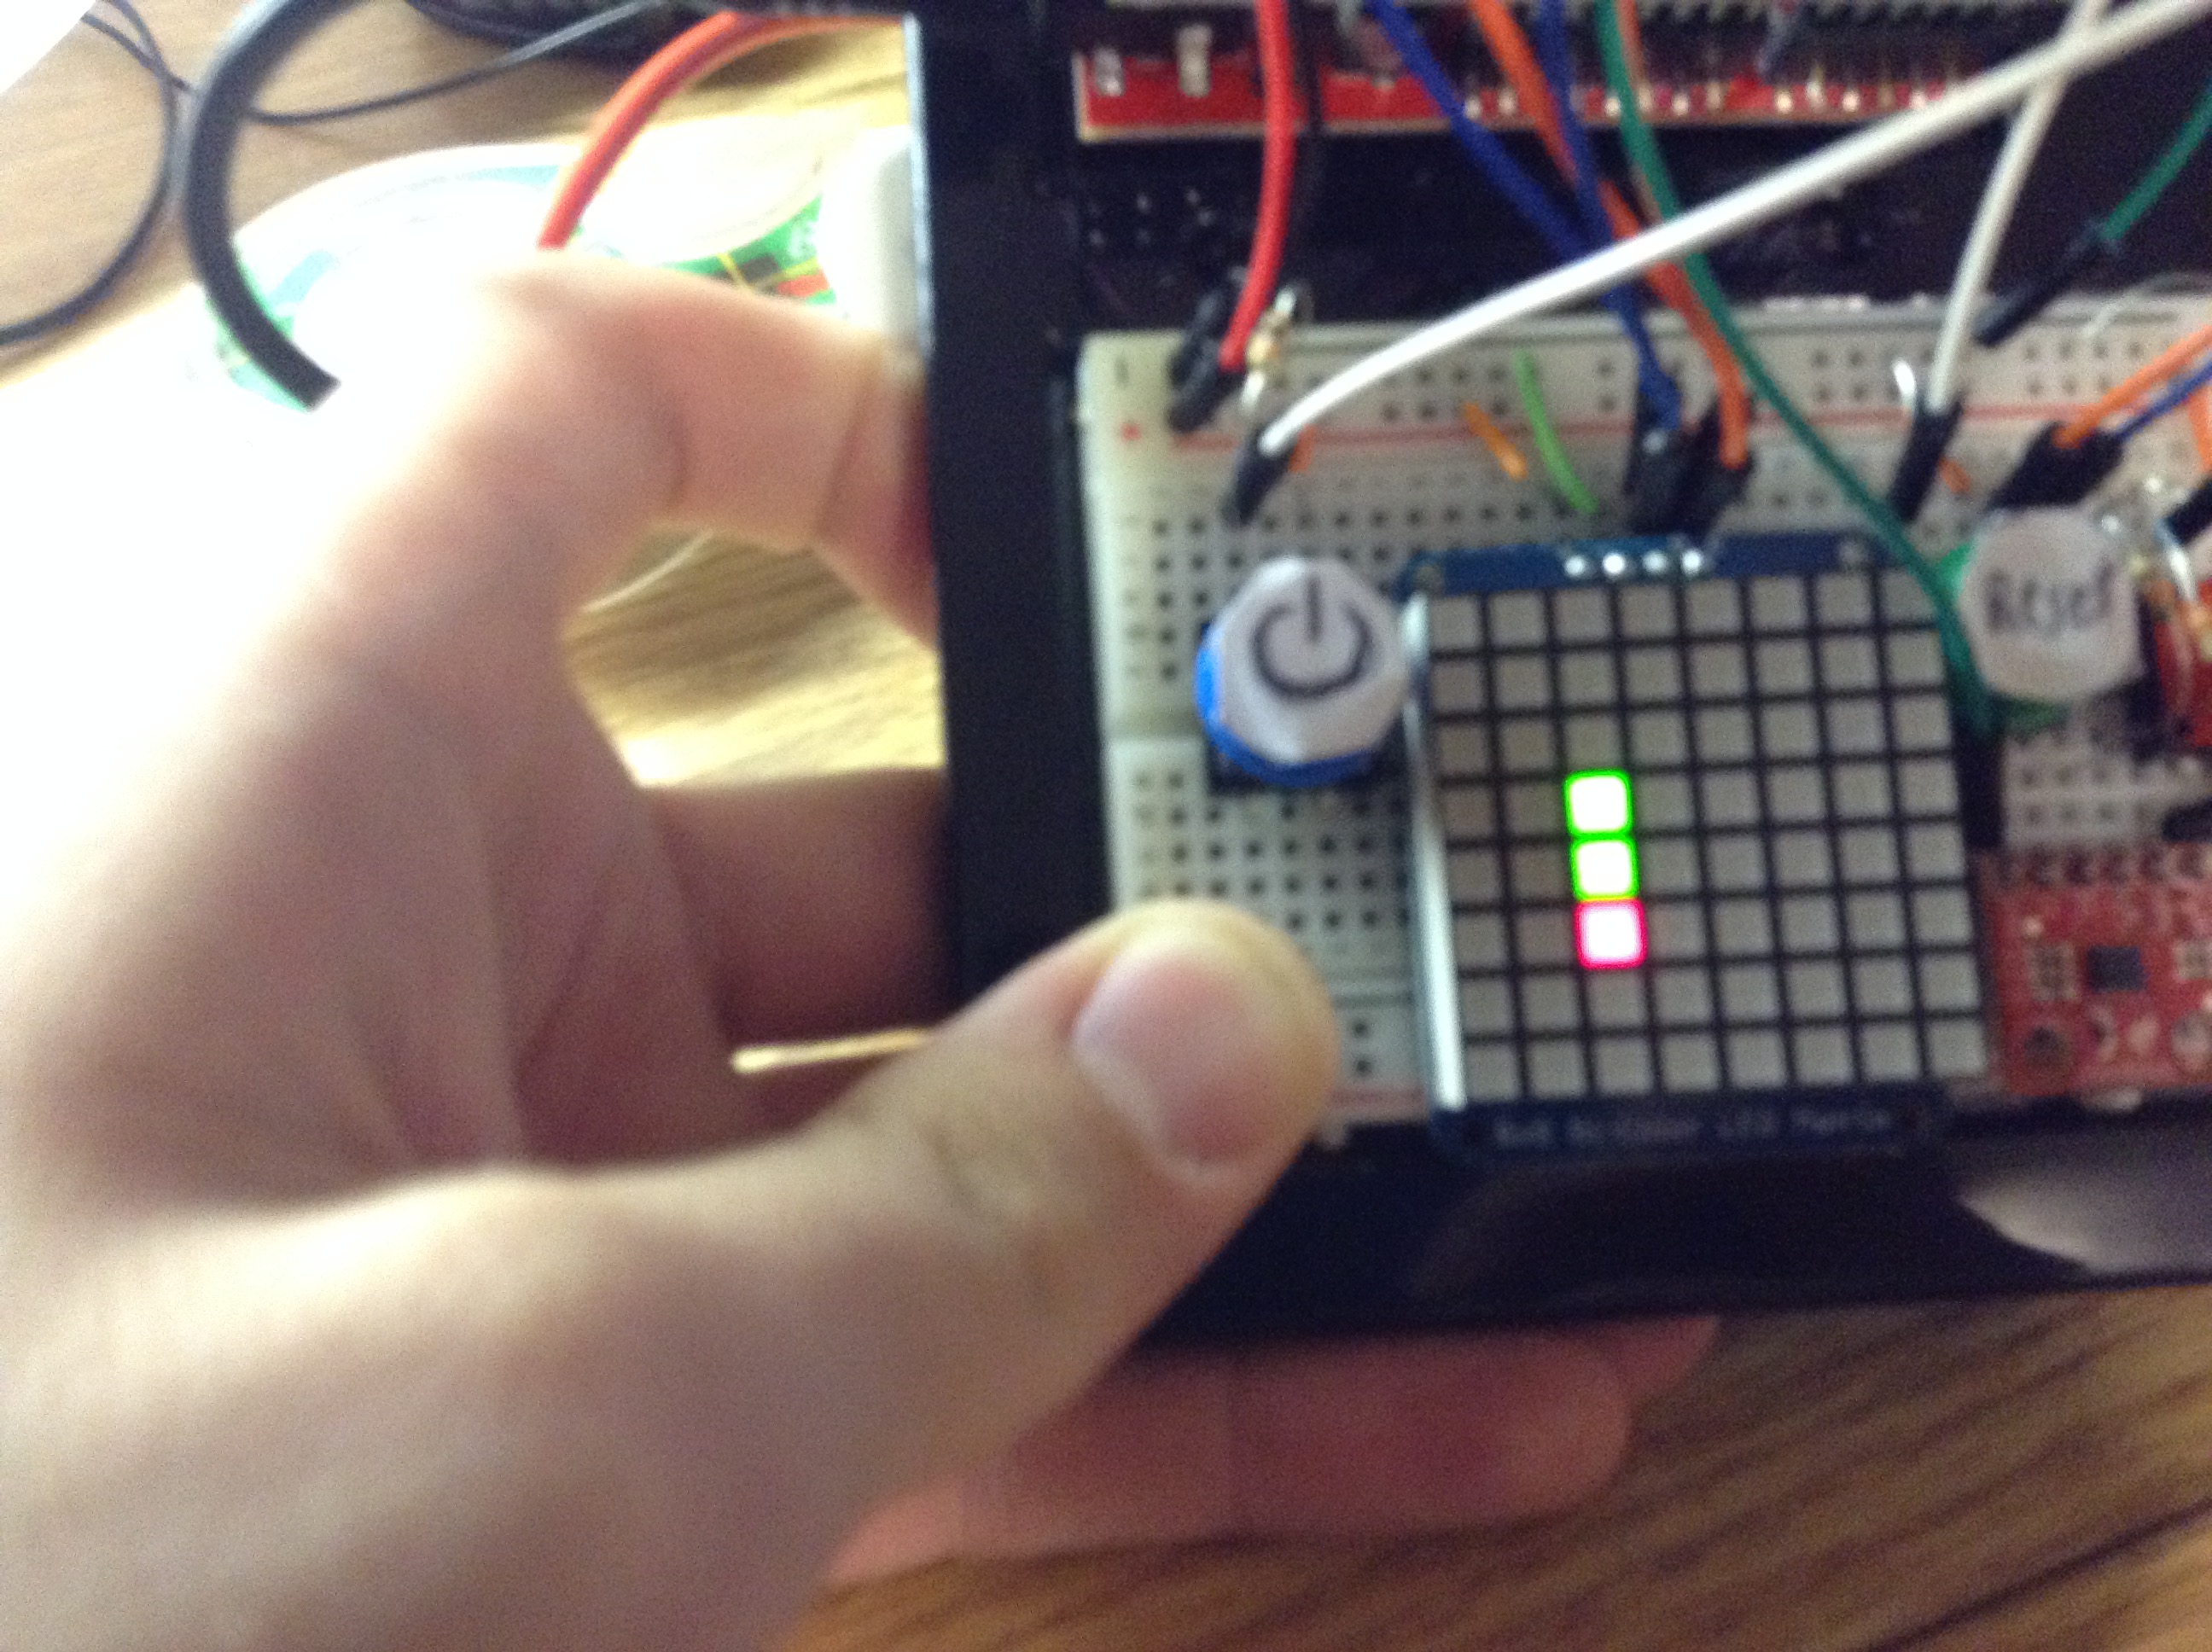
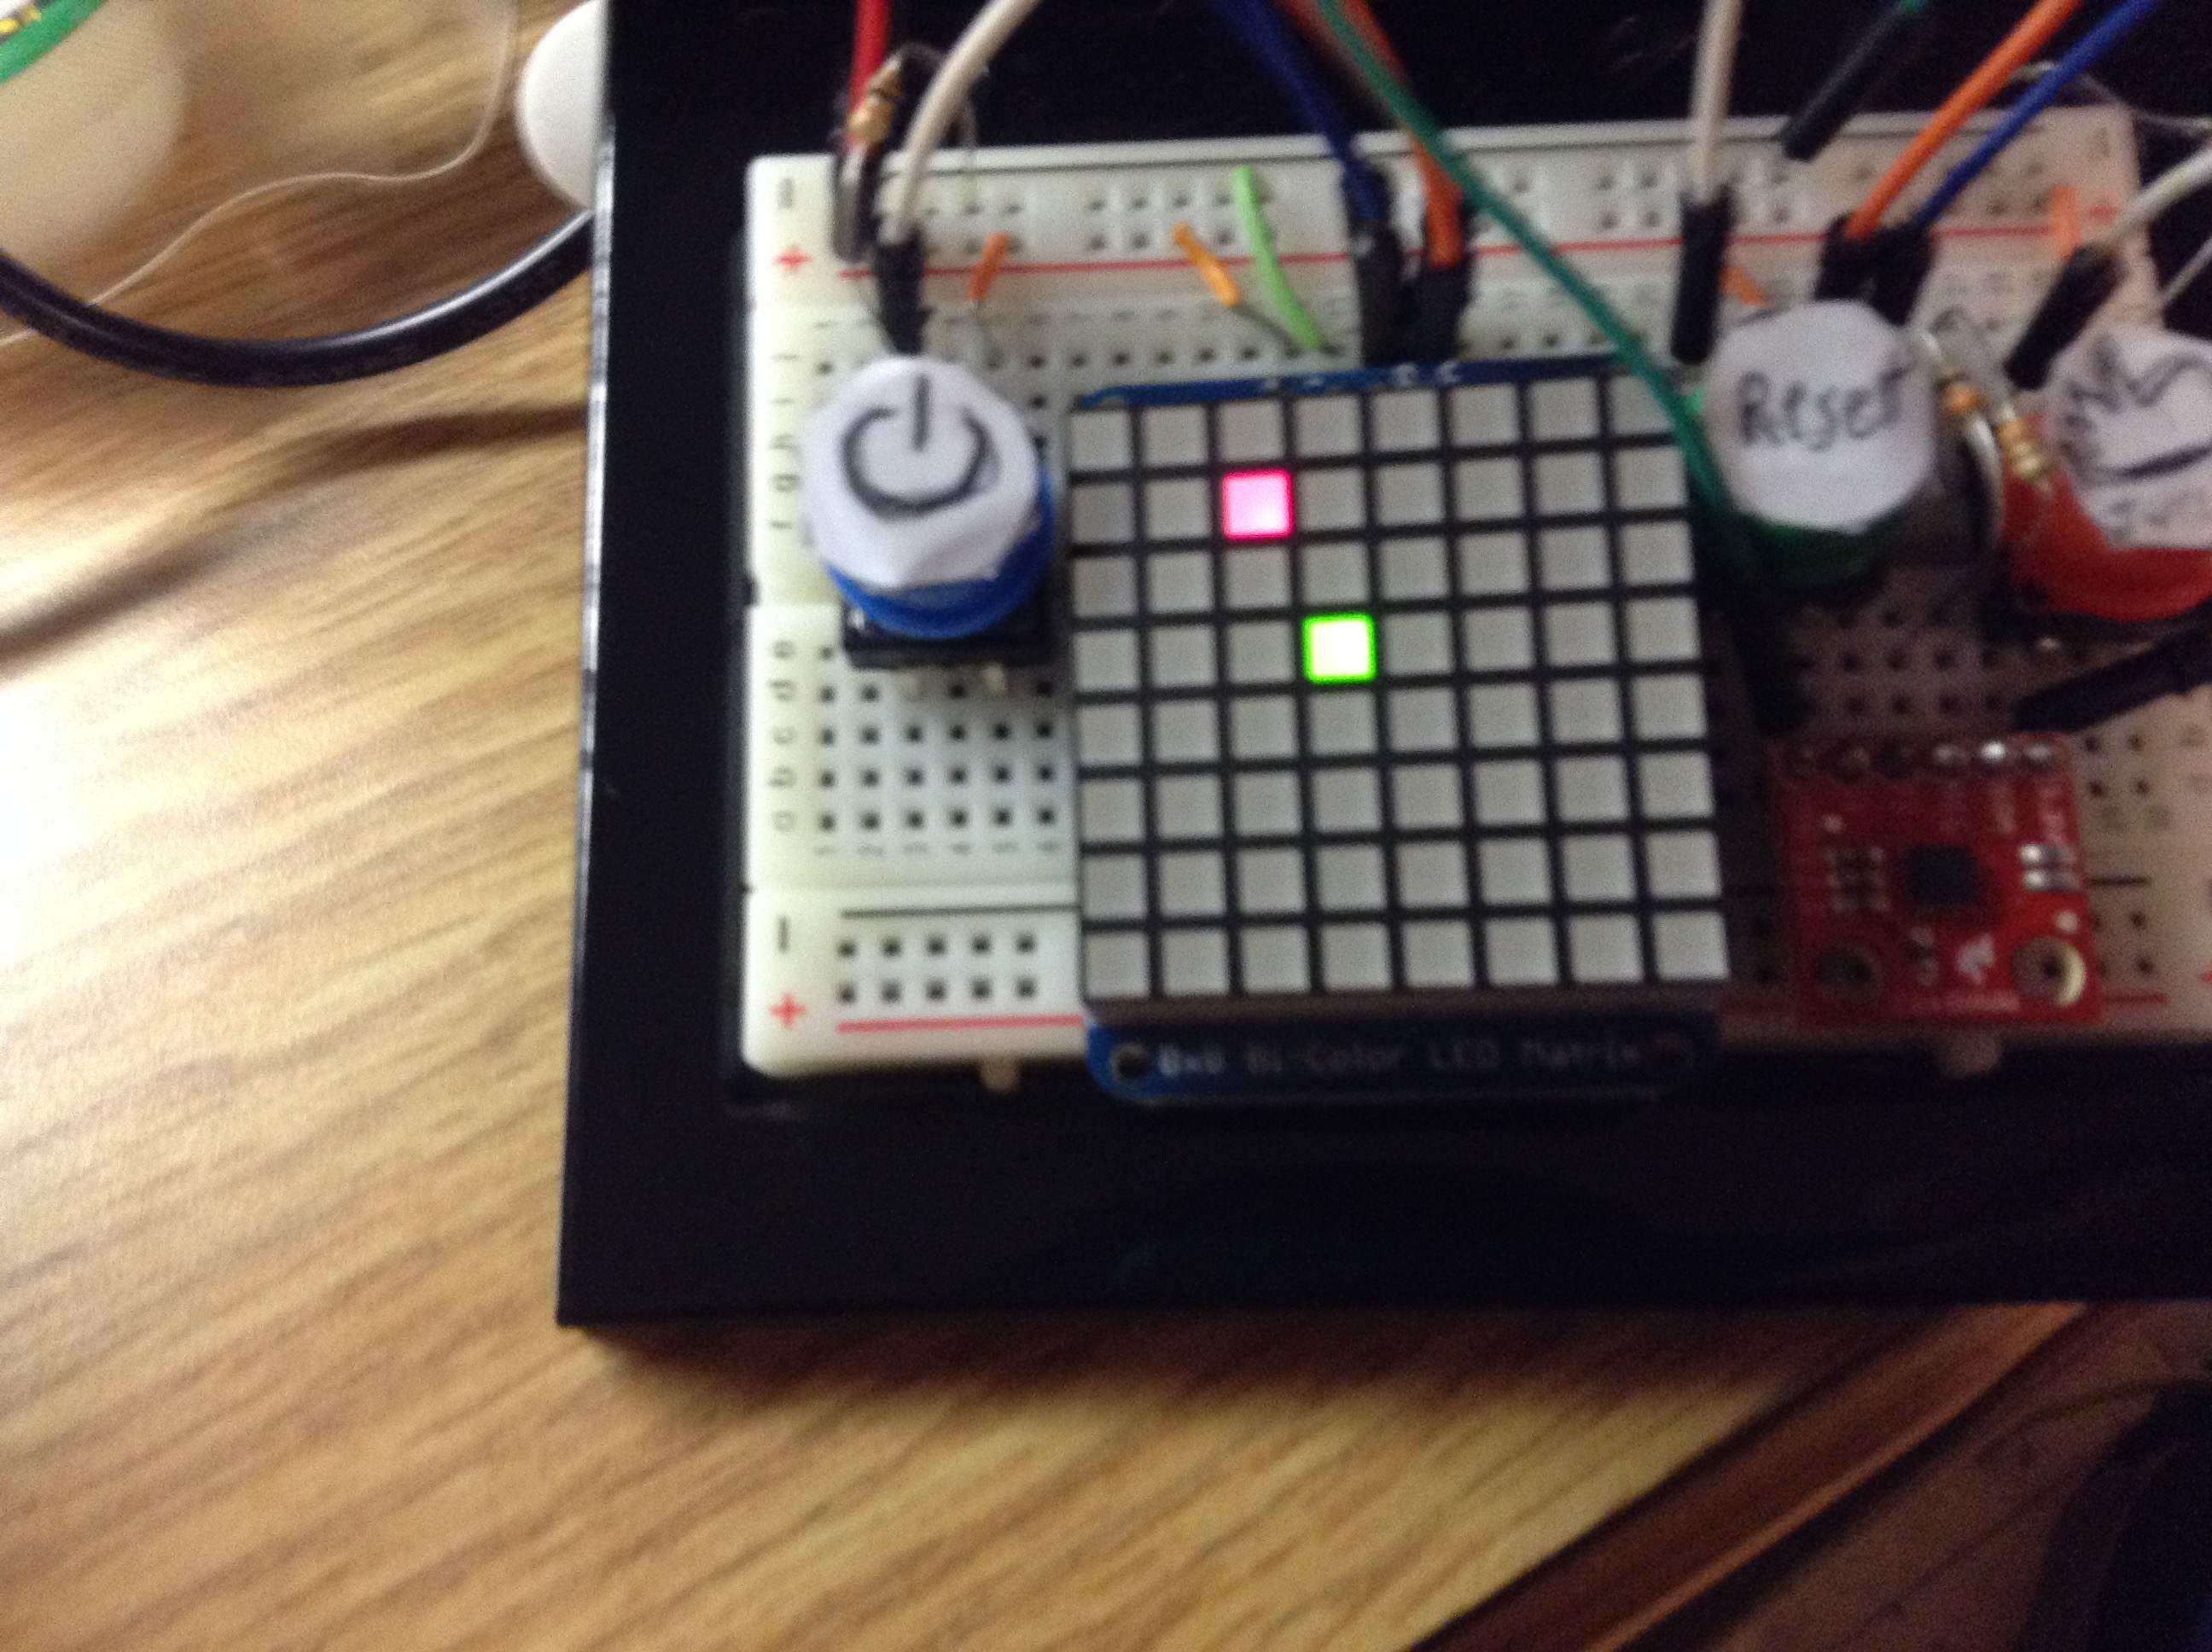
The game uses a simple bi-color 8×8 LED matrix as a display for the game itself and for the score after the game is over. It uses a triple-axis accelerometer which is attached to the breadboard right next to the LED matrix. The accelerometer is used to detect the movement of the whole game board. Basically, the direction you tilt the device will move the snake in the same direction as it is being tilted. For example, if you tilt it forward the snake will go up and so on. It also has an Ethernet shield on the Arduino so that the player can Tweet their score after they finish their game. Finally, the Gameduino also has three separate buttons on it as well. The blue button acts as a power button and when pushed will place the snake and target on the LED matrix and start up a game. The green button acts as a reset button which is mainly to be used after the player receives a game over to reset the game and go back to the blank start screen. Finally, the red button will send a Tweet of the player’s score, which was stored in the RedBoard’s EEPROM memory after game over, and, since Twitter does not like duplicate Tweets and it is very possible to get the same score more than once, it also sends the number of seconds since the last reset. The Tweet button does have to be pushed at the main screen at the beginning, in other words it has to be reset before hand.
(the game is easier to play than the video makes it seem, it was difficult to play the game with one hand and film with the other at the same time. Also my apologizes about the difficulty in reading the computer screen, it says “Snake Score” then the score I had, 3, and then “Time Since the Last Reset” and that time, 14 s.)
Once I started thinking about my final project at the start of the term I knew I wanted to do something involving a game. After doing some research on the internet I found someone that had recreated Super Mario Bros. on an LED martix and Arduino. After seeing this I knew I wanted to use the LED matrix to make some sort of game to play on the Arduino, however, due to my beginner coding skills I knew I would have to make the game simpler than the that. After thinking for a while I decided to make the game Snake, figuring that would be a simpler game to code and make. I did think then that it would be a very neat idea to use the Ethernet shield so the player would be able to Tweet there score after their game was over. I also thought it would be cool to add the GPS module into the circuit so that the time and date would be included in the Tweet as well, however, after I did my first intermediate project I saw just how much memory the GPS uses up and did not think I would have room for it with my final project so I left that feature out. Also, I had originally planned to control the snake using four push buttons, but my teacher suggested that I use the accelerometer to make the project a little more interesting and physical. I ended up using this and it turned out to be a fun and different way to play the game. I also had planned to incorporate a Piezo buzzer to make it so that the game plays a little tune during the game, but unfortunately I could not find a way to do this properly. I only know how to code music with the Piezo using delays and if I used the buzzer during play it then would make the game unplayable. If I used it for the game over display it would play the tune, then show the display, then play the tune, then the display and so on, not ever show them at the same time. I may have been able to solve this eventually, but due to time constraints I decided it would be better to just not worry about the device as it did not add much to the overall experience.
I ran into several problems while creating this project. One of the first major issues was simply getting the snake to move correctly. At first I had it so that the RedBoard did not care about the specific x and y values read by the accelerometer and rather only cared about the orientation of the accelerometer. After I adapted a code I found online, this worked fine and would play the game just fine. However, this also meant that the player had to tilt the board an extreme amount in order to get the snake to move. This worked, but was not the best set up for the game to work properly. Seeing this I decided to test out the values and set up the code so that it would read the position and if the x and y values were greater than or less than a certain value it would move the snake appropriately. Again this worked and for the most part the game ran fine, especially after I got some help from my instructor and was able to make the snake always moving. However, yet again I ran into one small issue that hindered the game’s fun and play ability. Basically, because of the way I set up the code if the device was tilted at a diagonal angle, especially the lower right, it would cause the snake to move diagonally. This obviously was a breaking glitch in the game. After talking with my professor we were able to figure out how to fix this. To put it simply I found the values when the accelerometer is flat and set that as the basic position and then found a threshold around that point. If appropriate values are greater than that threshold then the snake moves in the direction being tilted.

I ran into a few other issues as well. I originally had planned to have the blue button act as both the power button and the reset button, however, after running into some problems with trying to code that and seeing that I had room for another push button I decided to simply hook up another button which would do the resetting for me. The Tweet function also ran into some problems, since I originally had it set up to be able to send in the game over screen, but it would only work at one specific moment. I fixed this problem by having the Redboard store the score in the EEPROM memory and then have it be able to send at the start screen. It also took me a while to decide what I wanted to send in addition to the score in order to avoid the duplicate message issue. I tried some other set ups, but eventually got it to include the number of seconds since the last reset. Finally, one problem I ran into was that the game sometimes seems to crash when I use a 9volt battery. It would play the game fine, but would freeze up while in showing the game over screen. I tested it again while writing this and it seemed to work fine, however, to avoid this possible glitch I prefer to hook it up to the computer for power. This may be an issue with the battery being low on power or simply not having enough power to run all of the game features. Also I found that when using the battery that because of its weight it can be difficult to play the game. Having the battery hang of the side seems to make it so that you have to tilt with more force to get the accelerometer and snake to recognize the movement. This could probably be corrected by adjusting the thresholds in the code, or possible by adhering the battery to the bottom of the board, but it is difficult to say for sure. I am still unsure why is seemed to crash so often during tests before.
If you would like to build your own version of the Gameduino then see below for sketch, schematic, parts, and code.
Parts:
(1) SparkFun Redboard/ Arduino Uno
(1) MMA8452Q Triple-Axis Accelerometer
(1) 8×8 Bi-Color LED Matrix with I2C backpack (can be one color if so desire and can be done with out the I2C backpack, but will have to use different code)
(3) Push Buttons
(2) 10K Ohm Resistors
(2) 330 Ohm Resistors
(1) Arduino Ethernet Shield
Several Wires
Optional:
9 volt battery
Battery holder
The schematic and sketch can be viewed below:
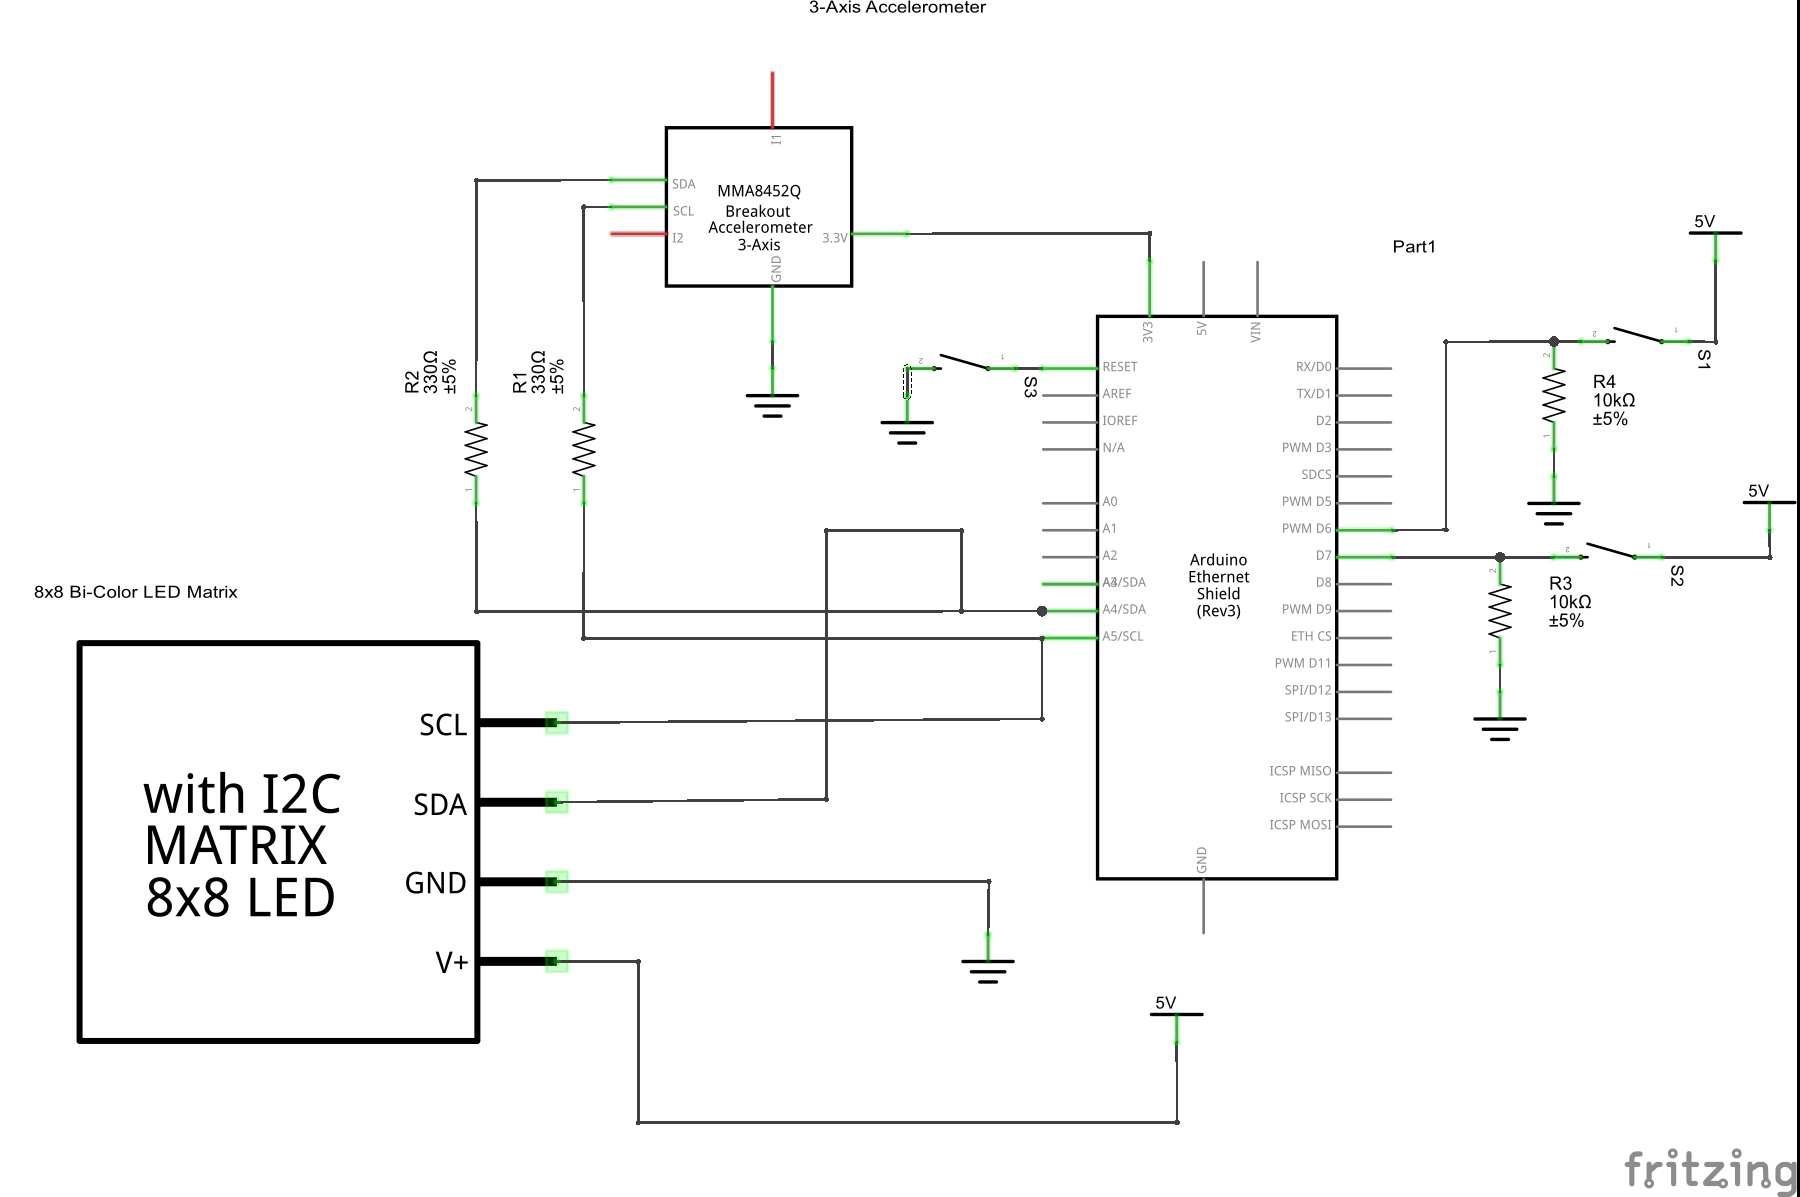
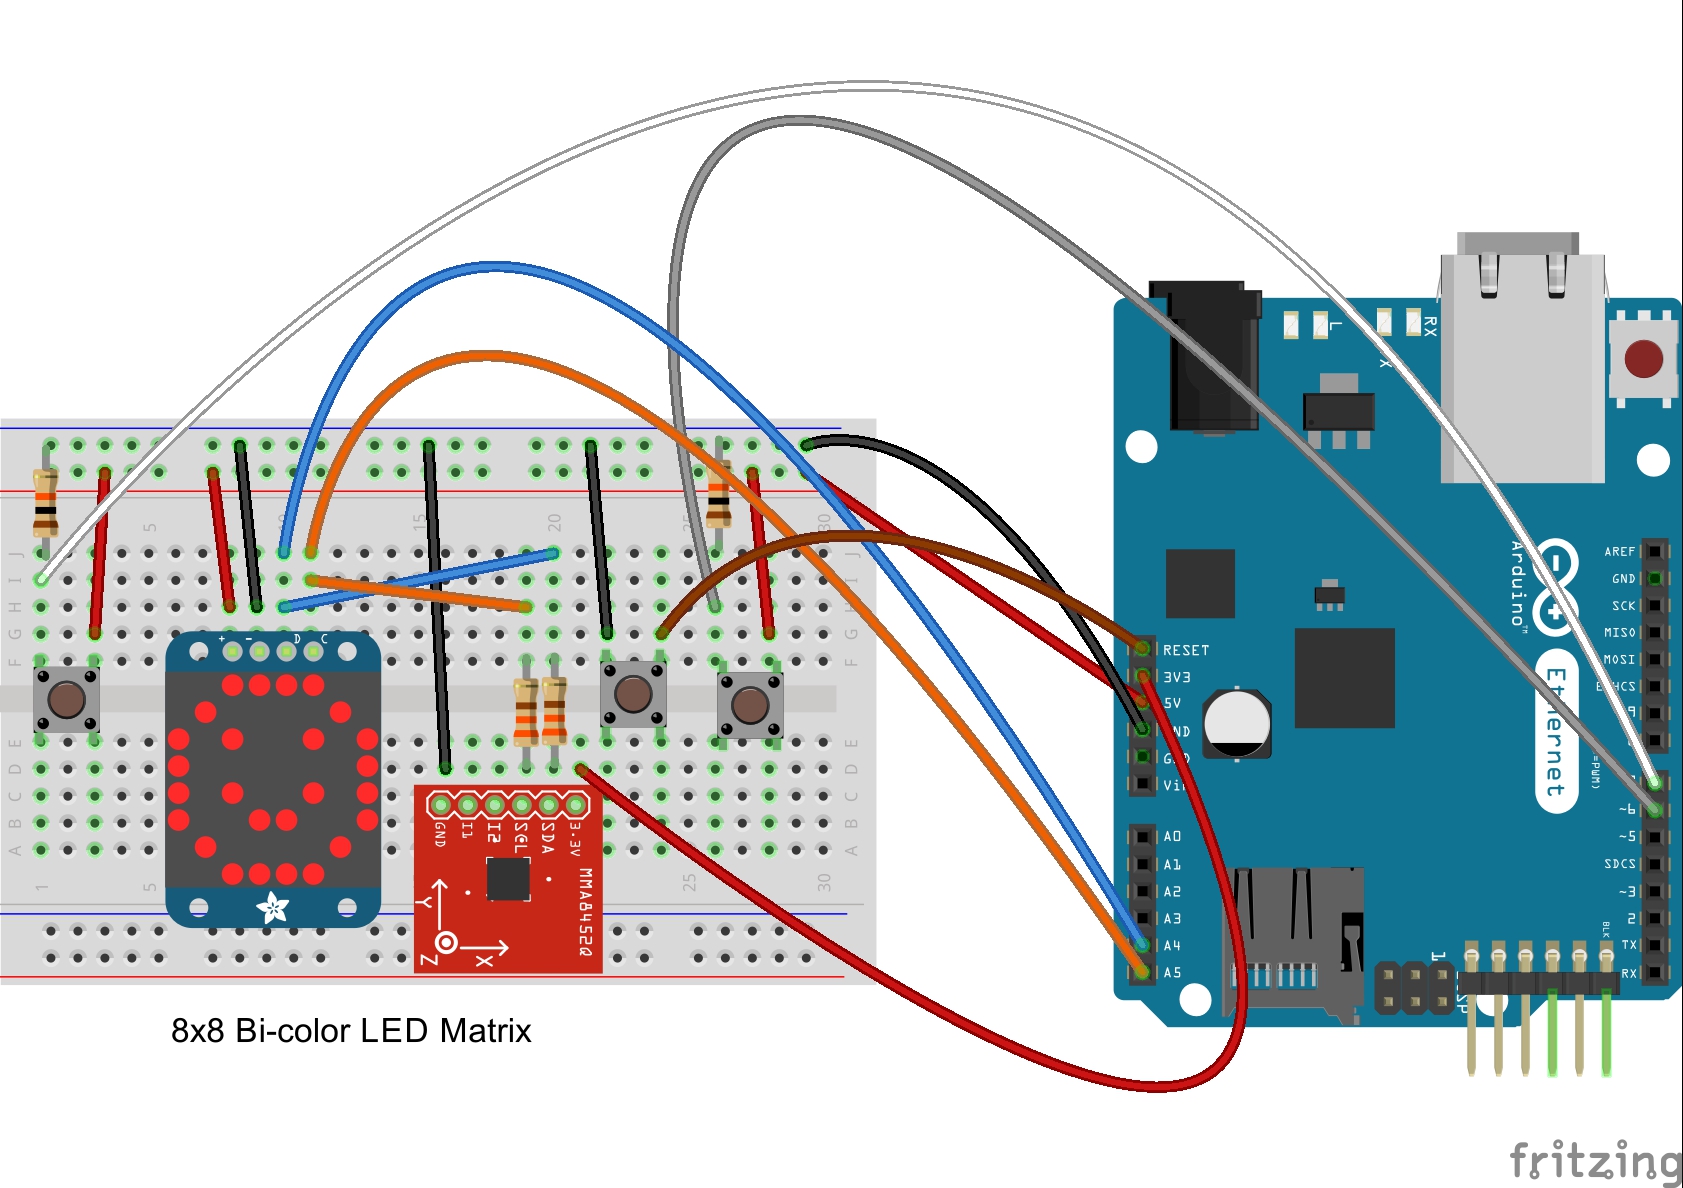
For the power button and Tweet button you want to run 5 volts into one side of each and from the other side you want to run a 10K resistor to ground so when the button is low it will complete the current and carry the voltage to ground and then also from that side you want to run a wire to whatever digital pins you want to use, I used 7 for my power button and 6 for my Tweet button. Then for the reset button we are using the reset pin so all we have to do is run a wire from the reset pin on the Redboard to one end of the button and run the other end directly into ground. This works because the reset pin will reset the Redboard or Arduino when it receives a LOW reading, and we can accomplish this by connecting it to ground. When the button is not pushed the reset pin reads a normal reading and then when it is pushed it will receive a reading from ground, or 0 volts, or LOW and thus reset the game with out having to push the reset button on the Redboard. The LED matrix has an Adafruit I2C backpack on it so it is very simple to connect. You want to run 5 volts into the pin with a plus sign (+) on the matrix so that it receives power. Then run the minus sign (-) pin to ground so the current has a place to run to. Since the matrix backpack uses I2C communication we then have to connect the SDA and SCL pins on the backpack to the appropriate pins on the Redboard. We can either use the pins labeled SDA and SCL on the Redboard or the A4 and A5 pins work for this function as well. If you wish to use the analog pins as I did then A4 works as SDA and A5 works as SCL. Then finally to hook up the triple-axis accelerometer you need to run 3.3 volts into the pin labeled 3.3 on the accelerometer and then run a wire from the ground pin on the accelerometer to ground. This will allow the current to run in an power the device and then to run to ground to complete the circuit. Then since the accelerometer is also an I2C device you need to run the SDA pin on the accelerometer through a 330 Ohm resistor to SDA or A4 on the Redboard and the SCL pin on the accelerometer through a 330 Ohm resistor to the SCL pin or A5 on the Redboard.
The code I used can be found here:
The comments of the code explain how most of it works, but basically the Redboard will set up its values and then if it reads a push of the blue button it will go through and draw both the target and snake from the information it received in the set up function. Then it will monitor to make sure the snake is in the playing area and that it has not hit itself, if both of these statements are true then it will call a function to detect the position of the accelerometer and move the snake accordingly, if either one is false it will call game over.
void moveSnake() { // this function will move the snake according to the accelerometer
  if (accel.available()) {
    accel.read(); //this will read the values of the accelerometer
    Serial.print("x: ");
    Serial.print(accel.cx, 3);
    Serial.print("\t");
    Serial.print("y: ");
    Serial.print(accel.cy, 3);
    Serial.print("\t");
    Serial.print("z: ");
    Serial.print(accel.cz, 3);
    Serial.print("\t");
    Serial.println(prevDirection);
    float restingX = 0; //the accelerometer at rest
    float restingY = 0;
    float threshold = 0.350; //how much it should be tilted to move the snake.


    Serial.println(accel.cy - restingY);
    Serial.println(accel.cx - restingX);
    Serial.println(abs(accel.cx - restingX));


    if (((accel.cy - restingY) > threshold) && (abs(accel.cx - restingX) < threshold)) { //if the accelerometer is tilted left
      Serial.println("Left");
      snakeY[0] = snakeY[0] + 1; // the snake will move to the left.
      prevDirection = 1;
    }

    if (((accel.cy - restingY) < -threshold) && (abs(accel.cx - restingX) < threshold)) { //if the accelerometer is tilted right
      Serial.println("Right");
      snakeY[0] = snakeY[0] - 1; // snake will move to the right
      prevDirection = 2;
    }

    if (((accel.cx - restingX) > threshold) && (abs(accel.cy - restingY) < threshold)) { //if the accelerometer is tilted up
      Serial.println("Up");
      snakeX[0] = snakeX[0] - 1; // the snake will move up
      prevDirection = 3;
    }

    if (((accel.cx - restingX) < -threshold) && (abs(accel.cy - restingY) < threshold)) { //if the accelerometer is tilted down
      Serial.println("Down");
      snakeX[0] = snakeX[0] + 1; // it will move the snake down
      prevDirection = 4;
    }

    if ((-threshold < accel.cx) && (accel.cx < threshold) && (-threshold < accel.cy) && (accel.cy < threshold)) {
      if (prevDirection == 1) {
        snakeY[0] = snakeY[0] + 1;
      }
      if (prevDirection == 2) {
        snakeY[0] = snakeY[0] - 1;
      }
      if (prevDirection == 3) {
        snakeX[0] = snakeX[0] - 1;
      }
      if (prevDirection == 4) {
        snakeX[0] = snakeX[0] + 1;
      }
    }
  }
}
This function begins by setting up the values that our x and y should be while the accelerometer, and board, are held flat. Next, we define a threshold for detecting tilting and thus movement. For example, if we want to move left we need our y value, which acts like a horizontal axis, minus our resting value to be larger than whatever we set our threshold as. Also since we want to avoid the moving diagonal glitch that I encountered in my second attempt at coding movement we have to make sure that the absolute value of the current x reading minus the resting x is less than our threshold. In other words we need to make sure our x value is between the threshold and the negative threshold meaning we cannot read two directions at once. In this case since we set our resting values as zero we probably could just use the accel.cx and accel.cy values instead of subtracting the resting value from them, however this will make it so that if we ever want to change the neutral position we can do so easily. The other three directions work in similar ways. For each direction we will also save the direction it was going in to a variable which, in order to make sure the game has enough challenge, will be activated when the accelerometer returns to a flat state and thus the snake will continue to move in whatever the last direction it had been moving in until it is tilted again.
Also while the snake is in the playing field, is moving, and has not hit itself, the game will be monitoring the position of the snake and target to see if the player scores.
    if ((snakeX[0] == targetX) && (snakeY[0] == targetY)) { //this will read if the snake is on the target
      snakeLength++; //if it is it will gain a length of one
      score++; // and the score will increase by one
      Serial.print("Score: "); // the score will then be written on the serial monitor
      Serial.println(score);
      if (snakeLength < maxSnake) { // if the snake is less than the maxium length
        makeTarget(); //then we will make a new target to go after
      }
      else {
        targetX = targetY = -1; //if it is not less than the max, then we will not
        //make any more targets
      }
    }
This checks if the snake’s head, represented by snakeX[0] and snakeY[0], is the same as the target’s coordinates. If this is false the target stays where it was and the snake stays the same length. If it is true then the snake will grow by one pixel and the score will go up by one point. The code will check how long the snake is then, if it is less than the maximum length of the snake then it will call a function and make another target for the snake to go after. If it is not less than the maximum length it will stop making targets. In my code I set the maximum length of the snake as 64, which is the entirety of the LED matrix. I did this because I only wanted the game to end if the snake died and not if it got to a certain length, if you want to alter this all you have to do is change the variable maxSnake in the code.
I am happy with how the Gameduino ended up turning out, however, there are still several improvements and modifications that could be made to it. For one, like I said it seems to behave different when hooked up with a battery. I am not sure if this is in the code, hardware, or is simply an issue of the battery adding weight to the set up. One other major improvement would be to include a wifi shield to the set up so that when one wanted to Tweet they did not have to plug in an Ethernet cable and rather can just use the wifi. This would be even more helpful if the battery could be working correctly. The device could also be expanded to have other games coded for it, like Breakout or as I said earlier Super Mario Bros. In addition if one were to use an Arduino with a larger memory it is possible that we could make the device have more than just one game at a time. Also a larger Arduino would allow for the use of the GPS module like I initially planned. A couple other improvements would be to have the Tweet include the length of the game time and not just the the time since the last reset. Also if the Piezo buzzer could be coded without delays it would be a neat little device to add to the whole set up.
Thank you for reading!